
Stuff i did for college, the brief was based on CAD/CAM.
Series of drawings i have been working on, both for projects and own enjoyment.


Title drawn by hand and scanned into photoshop, then blemishes were erased by using colour picker tool and fill tool to create a cleaner image. I also edited the contrast to get a clearer and bolder style.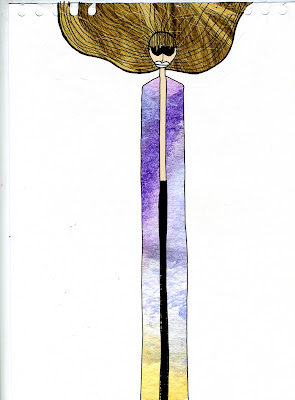 Simple line image of which was scanned into photoshop. i then scanned in another watercolour image which i had previously created. using the magic eraser tool, i erased the section of the drawing of which i wanted the underneath layer to show through. this then created a pattern on the garment of the figure. the hair is a scanned in image of my own hair, and i once again used the magic eraser to delete the sections of which i wanted it to show through. after i had deleted the desired areas, i placed the layers into the correct positions and flattened the image.
 Simple line image of which was scanned into photoshop. i then scanned in another watercolour image which i had previously created. using the magic eraser tool, i erased the section of the drawing of which i wanted the underneath layer to show through. this then created a pattern on the garment of the figure. the hair is a scanned in image of my own hair, and i once again used the magic eraser to delete the sections of which i wanted it to show through. after i had deleted the desired areas, i placed the layers into the correct positions and flattened the image.
 This image followed the same process as the above.
 Page taken from sketchbook. i had coloured the image using watercolours, but after scanning into photoshop i used the smuge tool in order to make the hair seem more liquid and realistic. i then also used a shape from a garment to place over the model.
 Simple line drawing which i then scanned into photoshop. i filled the image with colours first, then using the airbrush tool i created darker areas for shading.
 As above.
This is a section of a sketchbook cover which i scanned in. I intended to use it for my blog header, and in order to do so i needed to edit the pixel dimensions.
PHOTO EDITING & IMAGE MANIPULATION


image manipulation using d-slr canon 500d
adjusted apeture setting, also adjusted contrast on
 photoshop to make image more bold.
 These are a series of 5 photographs of which i took of my own hand in 5 different positions. in photoshop, i edited the opacity of each layer, to make the hand appear as though it's movement had been captured. I think it looks as though it is waving, which is a quite a snazzy effect.
 Original image taken by me using a digital camera. edited contrast.
 Using 'Underpainting' filter on photoshop.
 Copied and flipped image, then adjusted opacity of layer 1 to reveal the bottom layer.
 This is an image of myself. i scanned in my face in order to make it look as though i was drowning. then in photoshop, i edited the lightness and contrast to give a more realistic look to the picture.
 Original photo taken by myself of floating fabric.
I then used the 'plastic wrap' filter on photoshop.
MOOD BOARD

This is my mood board created for a current project. i used tools such as the colour picker and crop in order to create the final image. the colours at the top are picked from each of the circle images. i then edited the opacity of the images in order to be able to layer them but keep each part visible.
USING ILLUSTRATOR

Working drawing of mens tshirt done using adobe illustrator.

Fashion figure based on previous template. using brush 2 to create texture on garment and hair.

